Simple Solar Powered Air Conditioning
March 14, 2019
Evaporative cooling is an old technology which was used by ancient civilizations long before the advent of electricity. You may have heard the term swamp cooler. This nickname comes from the evaporated water that is used to achieve the temperature change. If you implement it wrong, you will get a hot, humid tent instead of a cool tent; a swamp. There are two main concepts that will be important. The dryer the outside air, the better. And there absolute MUST be constant airflow through the cooler into the tent and then out of the tent. If you set this up inside a closed tent with no exhaust vent coming out, it will not work. Many people make this mistake and wrongly conclude that these coolers don’t work. You must have at least as much air going out of your tent as there is coming in through the evaporative cooler. I mentioned above that the temperature difference can be up to 40 degrees below the outside temperature. This depends on the dew point. If you are somewhere very dry like the black rock desert with its 0% humidity, then the maximum potential temperature difference is 40 degrees. With higher humidity, the potential temperature difference is less. The science behind this calculation is complex, but in most areas, you will see at least some benefit. I have also added a major technical innovation which dramatically improves performance! 
My Parts List
 5 Gallon Bucket (With Lid): This is where the magic happens.
  Dryer Duct Disconnect: This dramatically simplifies the process of setting up and taking down or storing and transporting the cooler and it’s actually cheaper than using a flange which doesn’t make any sense to me.
  Dryer Duct: This will connect from the cooler to the fan just inside the tent. I went with a second duct after the fan but this is completely unnecessary in retrospect.
 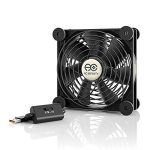 USB Powered Fan: This fan pushes 50 cubic feet per minute of air. The rule of thumb is that your evaporative cooler needs to change out all the air inside your tent every five minutes. So a 50 CFM fan will work for spaces up to 250 cubic feet. This is just under 7x7x7 or about the size of a Shiftpod. If you have a larger space, you might want to consider adding a second USB fan on a splitter, or just using a 120v fan instead of USB.
  Duct/Fan Flange Adapter: The dryer duct will clamp tightly onto this flange adapter which then screws tightly onto the fan, providing a good seal. I decided to get a second one for the inside-facing part of the fan and then attach a second duct, but that’s not necessary.
 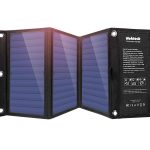 Solar Panel: I went with a larger one so that I can charge my phone as well, but this pump and fan draw less than ten watts total. So even this panel is larger than what’s necessary.
 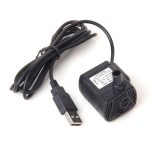 Water Pump: This pump has a connection for a 5/16” hose which you will also need to pick up. I used two of these pumps in case one has a problem, but this is probably unnecessary.
 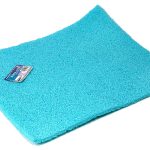 Swamp Cooler Pad: This just needs to reach at least to the top of the bucket when inserted around the edges. I have also used a few feet of chicken wire. This is optional, but should provide dramatic performance improvement. ## Let’s Build It!
The first step is to set the duct adapter in the center of the top of the lid. Then trace a line around it with sharpie and cut that piece out, leaving a hole for the female side of the duct connector. I sealed up the edges with a hot glue gun. Probably anything like silicone caulk or even just tape would work fine. This connection will be under suction, so it’s not going to try to come apart. 
 Next cut out holes in the side of the bucket for air to flow in through the pad. The plastic is pretty soft. I just used the knife on my leatherman. Remember, the hole coming out is just four inches across, so there’s no reason to go crazy with the holes in the sides of the bucket. Just make sure the surface area is at least as much as the hole on the top. Also keep in mind that the lower your holes go, the less water you will be able to put in the bucket, and the more often you will have to refill it. I did my holes right around the very top of the bucket. This works great. I might experiment with using some chicken wire or something to create some space between the material and the wall so that the surface area will increase.
  Now set the pump down inside the cooler and run the USB cord out the holes you cut in the side. I decided to use two pumps in case something happens to one of them, but probably one is fine. I also decided to zip tie the usb cords to the handle of the bucket in order to prevent them from getting yanked and messing up the internal layout. Fold the swamp cooler pad in half and insert it into the bucket, being sure not to leave any gaps for air to get through. The pad should stick out above the level of the lid. You will need to trim it down a couple inches to get it to fit tightly but without deforming when the lid is closed. Next, fold the section of hose at one end and zip tie it to close it off. I added some hot glue inside the closed tip for good measure. Then poke lots of holes in one side of the tube, forming a drip line. I found that a soldering iron worked great for this. The material in the pad is designed to spread the water out and saturate itself via a drip line, so it doesn’t have to be perfect.
  Now lay the hose along the top of the cooler pad (as shown above) with the holes pointed down, and run it down to the pump in the bottom of the bucket. ## Optional Alternative Pad Design
I had the realization that only a few square inches of the pad is being exposed to the air with this design. Most of it is totally useless. The function of the pad is to maximize surface area exposed to water, so the more of the pad that’s exposed to the air, the better it will perform. We need something to hold the pad away from the wall a bit, so that the air can come in and reach all around the pad. Some people work around this issue by drilling lots and lots of holes in the side of the bucket, but this really doesn’t solve the problem, it just increases the surface area somewhat, while severely limiting the amount of water the bucket can hold. The more water it can hold, the less frequently you have to remember to fill it. We also need to be sure that the area inside the pad remains wide enough to admit the inside lip of the connector on the lid. It will extend down into the opening somewhat, providing a better seal. Here is my solution to this non-trivial problem;  Using a few feet of chicken wire, I created a cylinder a few inches smaller than the bucket. Then I inserted the foam inside that cylinder, and added another smaller cylinder inside the foam to be sure that the lip of the lid connector would fit snugly inside. Then I ran the hoses through the two layers of foam and zip tied it all together. This is a major technical innovation over the design most people are using, where the pad touches the walls and only a small portion of it is exposed to the outside air. This design also leaves about an inch between the bottom of the bucket and the foam, which makes it much easier to dry it out when you’re not using it. This will help prevent mold between uses. Most people I’ve seen essentially throw the pad away after each use and replace it. This is not necessary with this design. I did notice a dramatic increase in performance with this alternative design. ## Put Together The Duct Assembly
Next up, we need to put together the top half of the machine, the duct assembly.  Connect the male side of the duct connector to the dryer duct. Connect the other side of the dryer duct to the fan adapter, and then connect the fan to the adapter. Make sure the fan is sucking air out of the duct instead of blowing air into the duct. Most fans have a diagram on one side which shows which way the airflow goes. I know the one I recommended has this helpful diagram. You’re done! When you’re ready to go, snap the male end of the duct assembly into the female duct connector in the lid of the bucket. Fill the bucket with water and connect the USB cords to the solar panel. Keep in mind, these pumps will burn out if they run out of water, so don’t let that happen! Probably this design will use about half a gallon of water per hour. Therefore, if it’s filled all the way up, it will have about eight hours of runtime at least. Make sure to check on it often until you get to know it. That’s it! Any time you have sunlight, you will have air conditioning! ## Other Things To Consider
In my case, I’m using a tent which does not reflect light, so it made sense to cover the tent with a cheap piece of aluminet which deflects most of the light and heat from the sun. This dramatically improves the effectiveness of the cooler. I also added an exhaust fan which draws warm air from the top of the tent into a second duct and pushes it outside. This alone would dramatically improve indoor temperatures in the mornings. Combining an exhaust fan with a swamp cooler means really great cool temperatures. I do think that I will go ahead and use chicken wire to keep the pad off the wall in order to maximize the surface area of the pad. As I mentioned above, if you have a larger space than the approximate size of a Shiftpod, you may want to consider adding a second USB fan on a duct splitter, or just using a 120v fan instead of USB. One other thought is that you might want to include a thermostat. I am planning on testing out this one on playa this year. ## Optional Exhaust Fans
 The idea with these is that they remove the hot air from the top of the tent. If the swamp cooler is on, then it will balance out the cool air coming in by pushing out the hot air at the top of the tent. If the swamp cooler is off, it will still suck a bit of air through it, but that air won’t be refrigerated. This should pair well with the cooler as outlined above to produce a really great air conditioned space. These fan assemblies are fairly similar to the one described above, but with a couple of differences. I used a pair of USB powered fans. My thinking was that since these are lower speed, two would work better than one. Also my tent had two vents to cover up, so why not do two fans? These exhaust assemblies connect to special panels I made out of vinyl and mylar. I used the same duct adapters as above, but this time I super glued them to the vinyl, and stitched the bolt holes down. These panels have one of these duct adapters on one side, and a velcro rectangle on the other side. These velcro rectangles match up with velcro I added to the tent around the built-in vents. Stitching velcro onto a tent is a non-trivial problem. You will need to use curved needles and probably pliers. I also made closed panels with the same velcro which can be placed over the vents instead of the fans, to keep them closed in case I don’t like these fans. I attached velcro zip ties to the fan grills in order to fasten them to the struts inside the tent. These are super handy. I use them a lot more than I expected to. They are great for managing cables or hanging up lights.
  I think I should be good this year on temperature in the mornings!